Blog

Inspiration

Hope Anchors the Soul: A Study in Hope [Free Download]

On a cool evening in April, my sister gave me a call. “Would you be interested in helping me write a devotional study about hope for a women’s event?” she asked. The answer was a resounding YES! We all need hope. It’s what makes life worthwhile. Hope helps get us through the darkest of days. The world needs hope, I need hope, and what a great honor to share it with others.

As I thought about this, I realized I hadn’t spent all that much time thinking about hope. I mean really truly pondering hope at the deepest level. What is it? What does it mean? How do we get it? What is hope, really?

The simplest definition of hope provided by the Merriam-Webster dictionary — as a noun and a verb — is trust. Hope is the confident expectation that something will happen. It’s reliance on the thing — or person — on which our hope is centered. With hope, we can rest assured that the thing we desire is unequivocally certain to happen.

As I considered this definition, I had to take a step back. It occurred to me how frequently I misuse the word hope. I think the same is true for many of us. When we use the word hope in conversation, often what we really mean is we wish something will happen. We want a thing to happen, but we’re not confident it will occur. This is because what we’re wishing for isn’t certain and is potentially unattainable. We can’t rest assured on wishes.

I think we sometimes use the word hope because we want so badly for what we wish for to be true, it’s like we’re trying to will it into existence. Somehow if we wish hard enough, it will happen. There’s an undertone of sadness in wishing. Compare this to the joyfulness that accompanies hoping, which comes from the fact that hope is underpinned by trust and confident expectation.

When we choose to follow Jesus, we can rest in the certainty of God’s promises. We have hope in knowing that we are saved through faith in Jesus Christ. As we’re told in scripture:

If you declare with your mouth, ‘Jesus is Lord,’ and believe in your heart that God has raised him from the dead, you will be saved. For it is with your heart that you believe and are justified, and it is with your mouth that you profess your faith and are saved.

~ Romans 10:9-10 (NIV)

We have the God of the universe on our side, who loved us so much that He sent His one and only Son to die for us. Knowing how much we’re loved by God is the best reason for hope. So is the understanding that nothing can separate us from the love of Christ. We can confidently trust in the hope of God’s love, as His love never fails (Psalm 136).

For I am convinced that neither death nor life, neither angels nor demons, neither the present nor the future, nor any powers, neither height nor depth, nor anything else in all creation, will be able to separate us from the love of God that is in Christ Jesus our Lord.

~ Romans 8:38-39 (NIV)

There are many examples of God’s hope-inducing love for us in scripture, and Hebrews 6:19 does a great job of creating a visual for us:

This hope is a strong and trustworthy anchor for our souls. It leads us through the curtain into God’s inner sanctuary.

~ Hebrews 6:19 (NLT)

Just as an anchor holds a ship fast in the midst of a storm, we can rest firmly assured in the hope of God’s promises no matter what might come our way.  This hope is an anchor for our souls that enables us to endure whatever trials we’re bound to face. While we won’t be able to avoid the troubles of the world, we can take heart because Jesus has overcome the world (John 16:33).

There’s such freedom in understanding that God loves us despite our sins and failures (Hebrews 10:10-18). The weights of the world are lifted off our shoulders when we respond to the call of Jesus, and in His love we’ll find rest for our souls (Matthew 11:28-30). We can rest assured because God’s promises are eternal (Matthew 24:35).

Spending time studying the hope that comes from placing our trust in Jesus Christ was good for my soul. It resulted in a 16 part devotional study covering hope created with my sister, which we would love to share with you. If you’re interested in a free PDF download of our study on hope, simply share your email address via the following submission box and we’ll send a copy your way.

Also, if you know of others who would benefit from our study on hope — or you plan to go through the study as a group — please send them our way to request a free PDF download. If you have thoughts to share, feel free to post them in the comments section. We always enjoy engaging in conversations that are helpful and hopeful.

Go back

Your message has been sent

Warning
Warning
Warning

Warning.


Hope Anchors the Soul Cover

Hope Anchors the Soul: A Devotional Study © 2019

Inspiration

What It Means to Love One Another Well

In late 2014, I met one of my best friends. We spent the early part of 2015 bonding over countless hours of road biking. We signed up for a ride scheduled for early May, which gave us just the level of motivation needed to complete regular training rides. But these rides were about so much more than building endurance. They were more about building a friendship that would last across the miles and years. It was about bonding in sisterhood and sharing the love of Christ.

This time of my life was pretty tough. In mid-2014, we were told my mom was in the final stages of her fight with metastatic breast cancer. This lady was a fighter, more than almost anyone I’ve ever met. She approached this battle with grace, and continued to shower us with love even as her health deteriorated.

As Terry and I biked, we talked about life, our families, the goodness of God, and so much more. It’s beyond my ability to express how these conversations enriched my life. I talked to my mom on the phone every day, and I couldn’t imagine not being able to share my musings about life with her. However, the deeper my relationship with Terry grew, the less of a concern this became.

yellow mamachari bike
Photo by Pixabay on Pexels.com

I came to understand the importance of having friends like Terry in my life. While there’s nothing quite like a mom such as mine, this type of sisterhood is also important. This is because you can bolster each other up during the tough times and remind each other of who you are in Christ.

In the words of King Solomon from the book of Ecclesiastes:

Two are better than one, because they have a good return for their labor: If either one of them falls down, one can help the other up. But pity anyone who falls and has no one to help them up.

~ Ecclesiastes 4:9-10 (NIV)

Winter came and went, and with the newness of spring, my mom entered her new life in the heavenly realms. I was at peace knowing she was no longer in pain and was in the presence of Jesus. Over the prior months, the friendships I had developed with Terry and many others covered me and my family with the love of Christ.

I experienced the truth Jesus was conveying when he said:

A new command I give you: Love one another. As I have loved you, so you must love one another. By this everyone will know that you are my disciples, if you love one another.

~ John 13:34-35 (NIV)

Shortly after my mom’s passing, the day of the big ride arrived. We awoke early, shivering at the starting line while we waited for the announcers to release us. Though it’s said “April showers bring May flowers”, we spent the whole 40 degree day under May showers with no flowers in sight. Wet and cold, we nonetheless continued on our way.

At the 30 mile halfway mark, we enjoyed lunch with our friend and riding companion, Elisabeth, and tried to get warm. Before long a support van appeared, offering to take riders who didn’t want to continue to the finish line. The three of us shared a look, and our eyes said what our voices would not. Had any of us spoken the word, our ride would have been finished. Instead, as a cohesive unit, we trudged on.

road landscape nature forest
Photo by veeterzy on Pexels.com

When you’re cold and tired and at your wits end, the mind can be a terrible thing. Remember, I had said farewell to my mom shortly before this event, counted in mere days. As the miles dragged on, and the feeling in my feet diminished, my mind started to get the best of me. To get through it, I turned my mind to lovely things like the smell of the rain, the sound of the birds on spring mornings, and my favorite songs.

I think this is partly what the Apostle Paul meant when he said:

Finally, brothers and sisters, whatever is true, whatever is noble, whatever is right, whatever is pure, whatever is lovely, whatever is admirable — if anything is excellent or praiseworthy — think about such things. Whatever you have learned or received or heard from me, or seen in me — put it into practice. And the God of peace will be with you.

~ Philippians 4:8-9 (NIV)

As I unclipped from my pedals and stepped onto the ground at the last rest stop, I quickly realized I could no longer feel my feet. A nice couple rushed over as they saw me stumble and ushered me to their van. Before I could say a word, they had wrapped me in a blanket, put me in front of a heater, and removed my socks and shoes. Once I was warm, they gave me new socks and sent me on my way.

I was enveloped in the kindness and love of these strangers for the rest of the ride. As I approached the finish line, they were there along with my friends, husband, and kids cheering me on. Suddenly, I didn’t miss my mom quite so badly. I realized I carried her love within me, and remembered that the love of Christ covers it all.

We can experience His love by taking time to appreciate the lovely smell of the rain, enjoying the company of friends and family, experiencing the kindness of strangers, and in so many other ways. As we’re told in 1 John 4, God is love and we’re able to love because God loved us first. We’ve been given a gift, and the most wonderful thing we can do is share it with others.

This is how God showed his love among us: He sent his one and only Son into the world that we might live through him. This is love: not that we loved God, but that he loved us and sent his Son as an atoning sacrifice for our sins. Dear friends, since God so loved us, we also ought to love one another.

~ 1 John 4: 9-11 (NIV)

When we choose to follow Christ, we become part of His body and each have a role to play (1 Corinthians 12). By discovering our God-given gifts, we’re able to contribute in the way He’s uniquely equipped us. However, if we discover our gifts and fail to love, what have really done?

As the Apostle Paul explains so clearly:

If I speak in the tongues of men or angels, but do not have love, I am only a resounding gong or a clanging cymbal. If I have the gift of prophecy and can fathom all mysteries and all knowledge, and if I have a faith that can move mountains, but do not have love, I am nothing. If I give all I possess to the poor and give over my body to hardship that I may boast, but do not have love, I gain nothing.

Love is patient, love is kind. It does not envy, it does not boast, it is not proud. It does not dishonor others, it is not self-seeking, it is not easily angered, it keeps no record of wrongs. Love does not delight in evil but rejoices with the truth. It always protects, always trusts, always perseveres.

Love never fails.

~ 1 Corinthians 13:1-8 (NIV)

Friends, let us love one another. Let us remember we’re not alone. God is with us always. And because of the love He has shown us, we can love others. May love be our motivation, the driving force behind who we are and what we do. Let us love people well.

For God so loved the world that he gave his one and only Son, that whoever believes in him shall not perish but have eternal life.

~ John 3:16 (NIV)

And now these three remain: faith, hope and love. But the greatest of these is love.

~ 1 Corinthians 13:13 (NIV)


Inspiration

Goal Setting: When is Enough, Enough?

While the beginning of a new year, month, or week always seems like a good time for reflection and goal setting, too often I get caught in the trap of framing my reflection in the negative. I didn’t exercise enough, eat well enough, run fast enough, read my Bible enough, and on and on it goes. This is reflected in my goals — exercise more, eat more veggies, do more whatever. All the more, more, more is exhausting rather than refreshing.

Here’s the thing — with this kind of thinking, enough is never enough. If you’ve ever practiced a sport, played an instrument, or done any other activity that requires a level of skill, you’ll know what I mean. You think to yourself, once I’ve done X it will get easier. You do X and while some aspects of the thing get easier, the thing itself doesn’t get easier.

To avoid the exhaustion that comes with this type of thinking, this time I purposefully framed my reflection and goal setting on three areas — what I want to keep doing, start doing, and stop doing. Starting with “keep doing” was great, as it was an opportunity to think about all the things I’m already doing — whether or not improvement is needed.

This process naturally led me to create goals that are framed in the positive, such as:

  • Eating with purpose: Continuing to eat pretty clean and working purposefully to eliminate even more processed foods from my diet.
  • Enhancing my piano skills: Continuing to play the piano every day and begin using an online tutor to improve my abilities.
  • Exercising regularly: Starting to exercise more regularly, striving to not let other things get in the way of this discipline.
  • Setting weekly goals: Using regular goal setting as a means to accomplish my work and educational goals, while also maintaining balance in my personal and spiritual life.
  • Spending time in the Bible: Maintaining my practice of reading the Bible daily and using a plan to help me read the whole Bible in a year.
  • Staying out of credit card debt: Continuing to pay off credit card debt monthly and avoiding the temptation to carry over a balance.

Now, in order to avoid the spiral of more, more, more, I need to continue to frame my thinking in the positive. Rather than focus on all the areas where I’m not enough, I’m going to remember that no matter how much I try, I’ll never be enough. And, that’s okay. In fact, it’s freeing.

All the striving leads to exhaustion, and when I’m exhausted I don’t want to do anything. Clearly, that’s not healthy and there’s a better way. I’m reminded of the words of Jesus Christ in Matthew 11:28-30 (NIV):

Then Jesus said, ‘Come to me, all of you who are weary and carry heavy burdens, and I will give you rest. Take my yoke upon you. Let me teach you, because I am humble and gentle at heart, and you will find rest for your souls. For my yoke is easy to bear, and the burden I give you is light.’

Jesus is telling us very clearly that there’s no reason for us to carry the burden on our own. We don’t need to worry about being enough, because Jesus is already enough. As His followers, we can rest in this truth. This doesn’t mean that we don’t need to try our best, but rather that we have hope in the Good News of who Jesus is and what He’s done even when we’re not enough. This is because Jesus is always enough.

So, I’m going to continue to set good goals that are framed in the positive and do my best to meet them. And, I’m going to turn to the only one who can satisfy my thirst and give me rest.

…Anyone who is thirsty may come to me! Anyone who believes in me may come and drink! For the scriptures declare, ‘Rivers of living water will flow from his heart.’

~ John 7:37-38 (NIV)

Recipes for the Family

How to Make Homemade Bread with Only 6 Ingredients

Although I avoid grains, my family (and son, in particular) sometimes enjoy sandwiches for lunch during the week. Many store-bought breads have a ton of ingredients, some of which aren’t easily recognizable. This makes the homemade variety of bread a healthier alternative. I chose to use all-purpose flour for this recipe, but it can easily be modified to include healthier grain options.

If my family is going to have bread, this six-ingredient recipe is a good alternative to the store-bought variety. They love eating it and I love knowing what was put into it. Feel free to modify the recipe to include the ingredients that will work best for your family.

Let’s get into how to make this simple six-ingredient bread!

Ingredients

This homemade bread recipe has only six simple ingredients:

  • 2 cups warm water (110 degrees F)
  • 2/3 cups sugar (our preference is coconut sugar)
  • 1 1/2 Tbsps. active dry yeast
  • 1 1/2 tsps. salt
  • 1/4 cup plus 2 Tbsps. melted butter
  • 6 to 7 cups all-purpose flour

Directions

This six-ingredient bread takes about 30 minutes of active preparation, plus about 30 minutes to cook. You can expect to have fresh bread warm from your oven in about two and a half or three hours. I use a KitchenAid stand mixer, which takes away some of the kneading. However, you can just as easily bypass the stand mixer and do it all by hand.

To make this six-ingredient bread:

1. Proof the Yeast

Begin by dissolving the sugar in the warm water (make sure the water is about 110 degrees F). Once the sugar is dissolved, stir in the yeast. Let it sit (proof) until the yeast looks foamy and creamy. If it doesn’t get foamy, it means either your water was too hot or your yeast was too old (check the package to make sure it hasn’t expired before you begin).

The amount of time this step takes depends on the warmth of your kitchen … the warmer it is, the quicker it will proof. The temperature of my house is set at about 72-74 degrees and this process took about 10 minutes.

1 Proof the Yeast

2. Add Salt, Melted Butter, & Flour

The next step in making six-ingredient homemade bread is to stir in the salt, 1/4 cup of the melted butter, and the flour into the proofed yeast. If you’re using a KitchenAid stand mixer, add the yeast mixture, salt, and melted butter (make sure it’s not too hot) and mix on low until combined. Otherwise, follow the same process, but stir by hand.

2 Salt, Butter and Flour part 1

Slowly stir in the flour to the mixture. If you’re using a KitchenAid stand mixer, the flour will fly out of the bowl if you mix it too quickly. Add enough flour so your dough has a smooth surface. This will typically take between six to seven cups of flour. If you aren’t using a stand mixer, add flour and knead the dough by hand until the surface is smooth.

2 Salt, Butter and Flour part 2.jpg

3. Let the Dough Rise for 1 Hour

Now it’s time for you to go find something else to do and let the yeast get to work. Place your dough in an oiled bowl. I use a glass bowl coated with cooking spray.

3 Let the Dough Rise 1

Once the dough is in the bowl, cover it with a damp cloth. You need to let it rise covered until it’s doubled in size. This typically takes about an hour, but the amount of time it takes to rise will depend on the warmth of your kitchen.

3 Let the Dough Rise 2.jpg

Once your dough has about doubled in size, you’re ready to move on to the next step.

3 Let the Dough Rise 3.jpg

4. Form the Dough into Loaves & Let it Rise Again

Once your dough has doubled in size, punch it down and spend a few minutes kneading it on a lightly floured surface. You should knead the dough until you end up with a relatively smooth surface.

4 Form the Dough into Loaves 1.jpg

After your dough has a smooth surface, divide it in two relatively even portions.

4 Form the Dough into Loaves 2.jpg
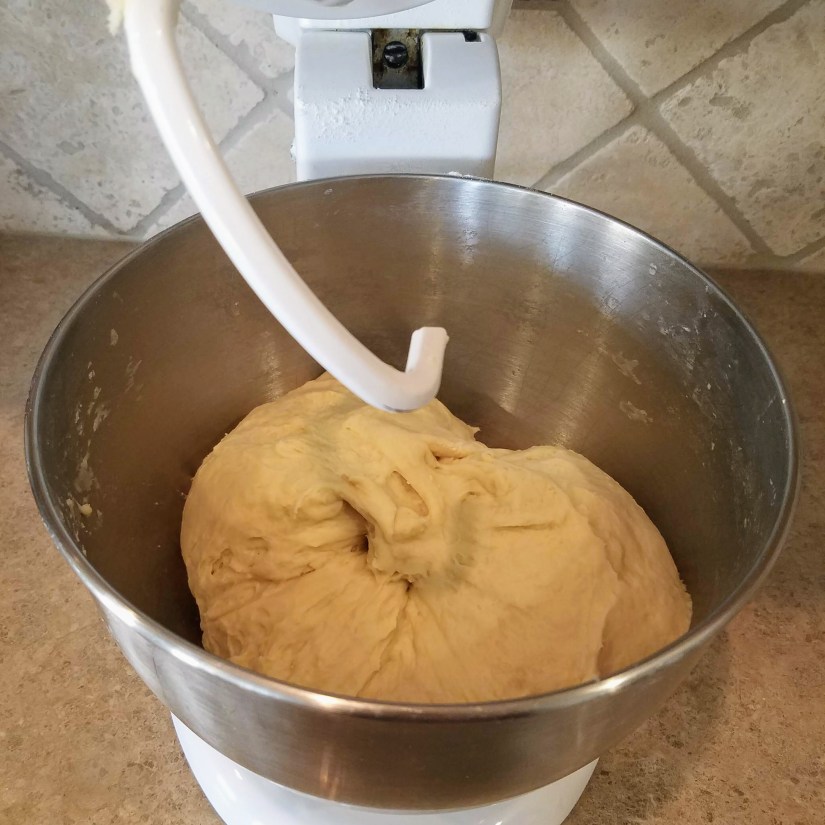
Next, form the dough into loaves and place them into well-oiled bread pans. Again, for this portion of the step, I prefer to use cooking spray.

4 Form the Dough into Loaves 3.jpg

Cover the pans with a dry towel and let them rise for about 30 minutes. The dough will typically be at the top of the pan or about one inch above it.

4 Form the Dough into Loaves 4.jpg

5. Bake the Loaves at 350 Degrees for 30 Minutes

Once the loaves have finished rising, brush melted butter on the top of them (this helps the browning process). You can also cut slits into the top, for a decorative touch. Place the loaves in a pre-heated 350 degree oven and let them bake for about 30 minutes or until browned on the top.

5 Bake the Loaves 1

When the loaves are lightly golden in color, remove them from the oven, brush them with a little more melted butter, and let them cool. Once cooled, slice and enjoy. Store the loaves in an airtight container or gallon-size freezer bags. This bread doesn’t have any added preservatives, so to make it last longer you can also freeze it and take it out when you’re ready to enjoy it.

5 Bake the Loaves 2.jpg
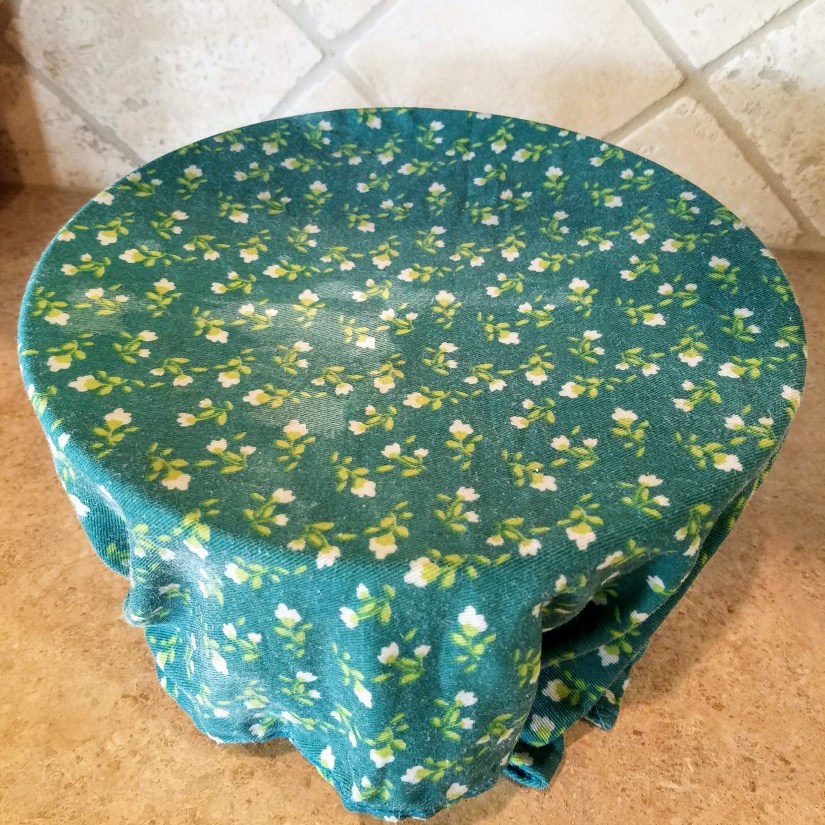
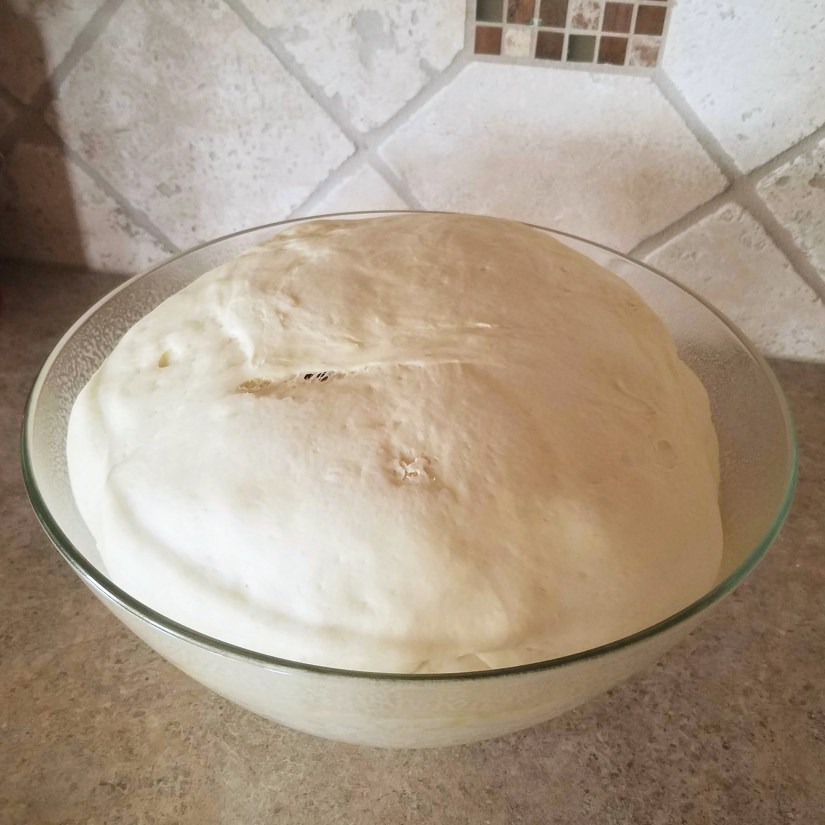
Six-Ingredient Homemade Bread Wrap Up

This six-ingredient homemade bread recipe is simple to make. While I avoid grains, my family enjoys them from time-to-time. Knowing the ingredients that went into what I’m feeding my family gives me a certain level of comfort.

If you try out this recipe and have comments or suggestions, feel free to share them with us! Enjoy!


Yamaha MOXF

How to Create a Yamaha MOXF Layered Sound Patch in 5 Steps

Yamaha’s MOXF line of synthesizers are some of the best on the market. Even so, programming the MOXF can be challenging. We’ve created this guide to provide you with step-by-step instructions on how to create a layered sound patch in five steps. Once your patch is created, you can permanently store it in your Yamaha MOXF.

The five steps to program a layered sound patch in your Yamaha MOXF are:

1. Select the Yamaha MOXF Voice Mode

Step 1 Select Voice Mode.jpg

The first step in programming a sound on your Yamaha MOXF is to select voice mode. You can do this by pressing the “VOICE” button located to the right of the radial data dial. Once you’ve pressed this button you can select the first voice (aka, sound) you want to include in your layered sound patch.

2. Choose Your First Sound

Step 2 Choose Your Sound.jpg

Now that you’re in voice mode, you need to choose your first sound. You’ll start by pressing the “CATEGORY SEARCH” button to the left of the radial data dial. This takes you to a menu where you can browse the Yamaha MOXF sounds. Yamaha has published a voice list that details all the available sounds in the MOXF, making choosing a sound easier.

Scroll Through the Voice List & Select Your First Sound Category

Step 2 Choose Your Sound part 2.jpg
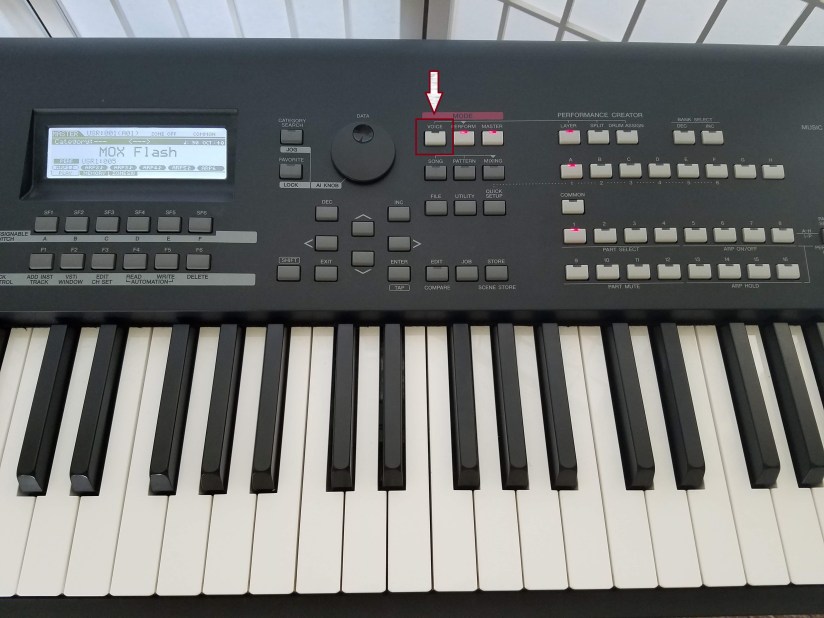
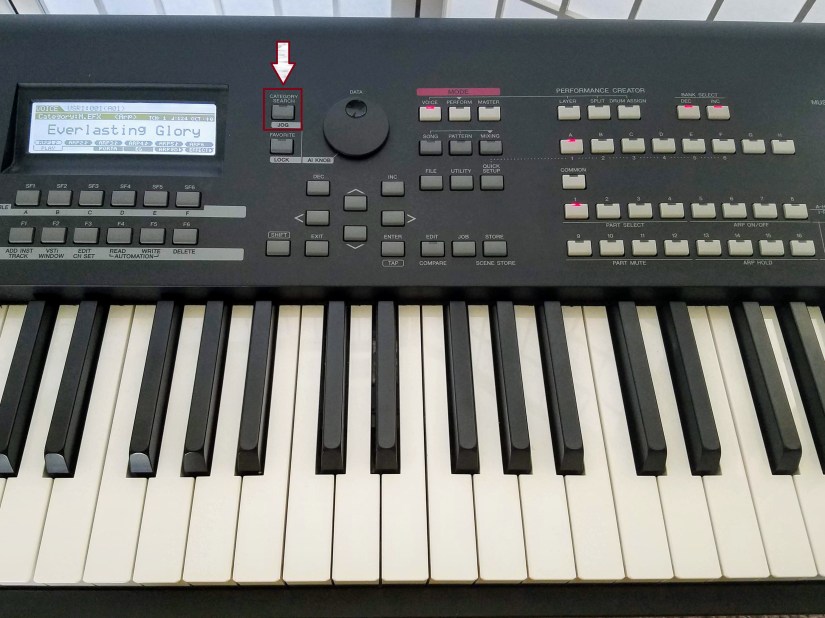
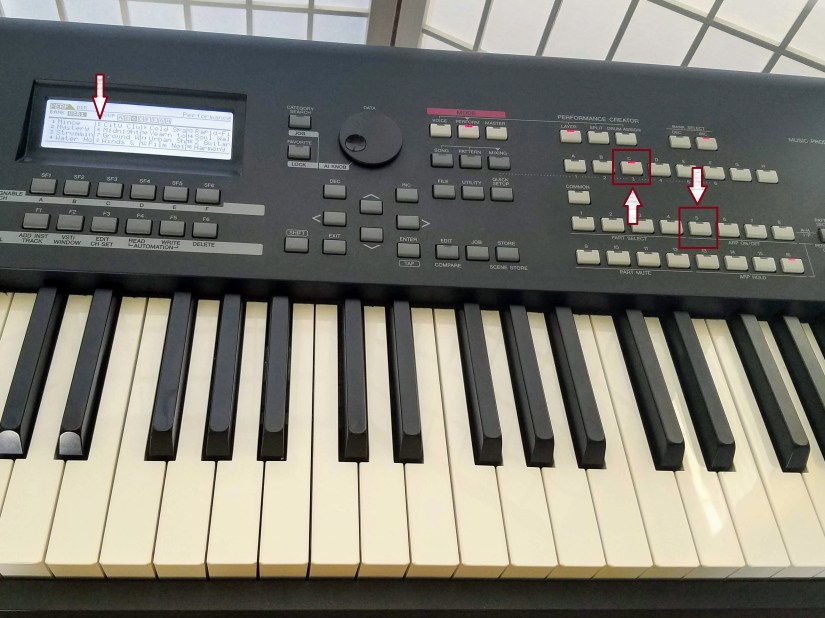
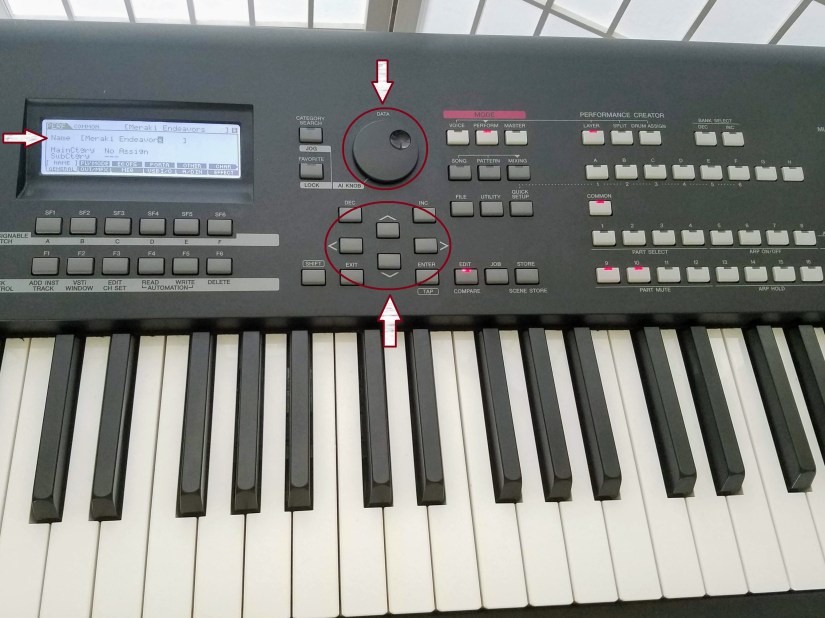
The next part of this step is to scroll through the voice list to select your sound category. You’ll do this by turning the radial data dial. When you do this you’ll be able to scroll through the available categories shown on the display of your Yamaha MOXF synthesizer. Once you’ve found the right category, you’ll again press the “CATEGORY SEARCH” button.

Select Your First Sound

Step 2 Choose Your Sound part 3.jpg

To select your first sound, you’ll again use the radial data dial to scroll through the voice menu. The voice options will be displayed on the screen of your Yamaha MOXF synthesizer. Once you’ve found your chosen sound, you’ll press the “ENTER” button. This button is located above the middle D# key on the MOXF control panel.

3. Layer Your Second Sound into Your Patch

Step 3 Layer Your Second Sound.jpg

Now that you’ve chosen your first sound, the next step is layer your second sound into your patch. To do this, you’ll begin by pressing the “LAYER” button in the performance creator section of your Yamaha MOXF. This button is located directly to the right of the last button in the mode section of the MOXF keyboard control panel.

Scroll Through the Voice List & Select Your Second Sound Category

Step 3 Layer Your Second Sound part 2.jpg

As with your first sound, the first task in this process is scrolling through the voice list to select your sound category using the radial data dial. Once you’ve found the category in which your sound is located, you’ll press the “CATEGORY SEARCH” button. Again, this button is located to the left of the radial data dial.

Select Your Second Sound

Step 3 Layer Your Second Sound part 3.jpg
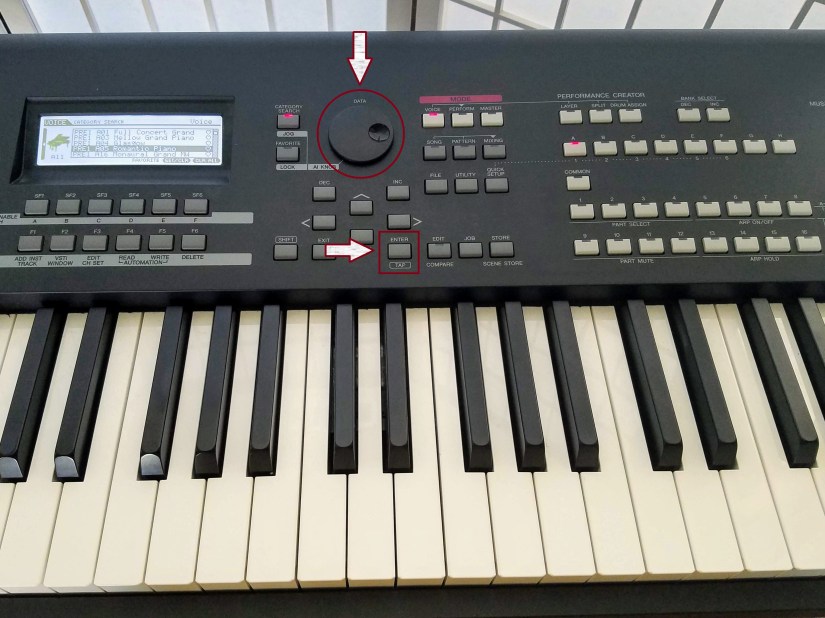
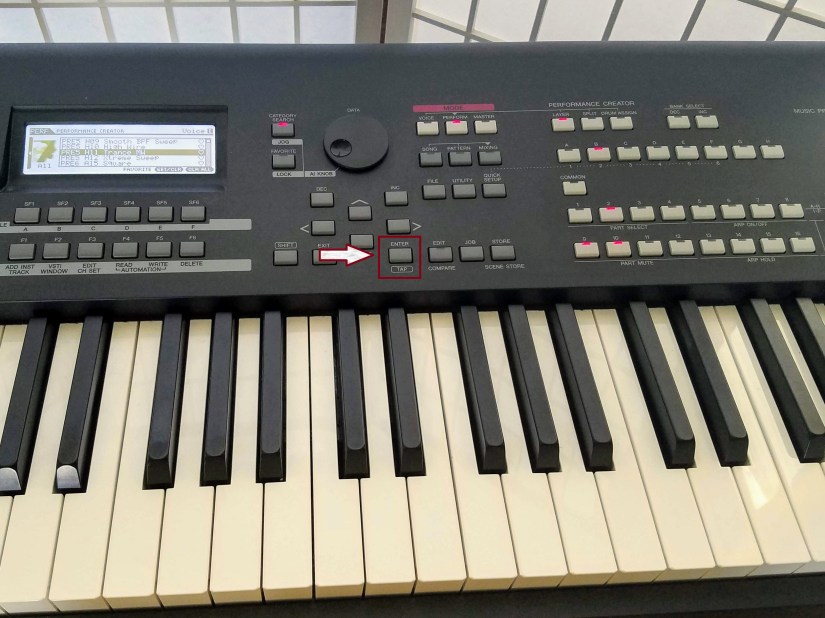
This portion of creating a layered sound patch is the same as the process you used to select your first sound. Once you’ve found your second sound in the voice menu, you’ll press the “ENTER” button to select it. This button is located directly above the D# key on the control panel of your Yamaha MOXF keyboard.

4. Save Your New Yamaha MOXF Layered Sound Patch

Step 4 Saving Your Sound Patch.jpg

Now that you’ve layered both of your selected voices into your sound patch, your next step is to save it. By saving it, you’ll be able to quickly access it any time, such as during a performance. This process starts by pressing the “STORE” button, which is located on the Yamaha MOXF control panel above the middle G# key.

Choose a Performance Location to Save Your Layered Sound Patch

Step 4 Saving Your Sound Patch part 2.jpg

Now you’re ready to store your sound so you can access it quickly at any time, including during a live performance. You’ll start by pressing the sound bank button where you want it stored (lettered A-H), then pressing the numbered button (1-16) to identify the sound bank location. The sound patches already located in the selected sound bank are shown on the display.

Finish Saving Your Sound Patch

Step 4 Saving Your Sound Patch part 3.jpg

Now it’s time to save your new layered sound patch by pressing the “ENTER” button. If you want to double check that you’re not writing over a sound you want to keep for later use, you can press the “EDIT” button. This allows you to hear how the patch currently stored in your selected location sounds.

5. Give Your New Layered Sound Patch a Name

Step 5 Give Your Sound Patch a Name.jpg

Now that you’ve created your layered sound patch, giving it a name makes it easier to find the next time you want to use it. If you’ve created the patch for use with a particular song, naming it after that song is a good option. If you’re planning to use it in multiple songs, you might want to give it a general descriptive name. This process starts by pressing the “EDIT” button.

Input the Name of Your Sound Patch in the MOXF Sound Bank

Step 5 Give Your Sound Patch a Name part 2.jpg

Once you’ve pressed the “EDIT” button, you’ll use the radial data dial to choose each letter, number, or symbol you want to include in the name. Once you’ve made your selection, you’ll use the arrow buttons to move to the next space in the name.

Save Your New Sound Patch Name

Step 5 Give Your Sound Patch a Name part 3.jpg

Now it’s time to save your sound patch. Just as you did when you created the sound patch, you’ll do this by pressing the “ENTER” button. Yamaha gives you an option of viewing the details about the current sound patch by pressing the “EDIT” button. Once, you’ve pressed save, your sound patch will appear on the display with its new name!

Programming a Yamaha MOXF Sound Patch Wrap-Up

Wrap Up - MOXF Sound Patch.jpg

In this guide, we’ve shown you how to create a layered sound patch using your Yamaha MOXF synthesizer. If you follow these five simple steps, the process of programming a sound patch is quick and easy. Creating custom sound patches will make your performances sound professional. Plus, the sound bank makes sound patches easy to access during a live performance.

If you have any questions, feel free to post a comment!