
Yamaha’s MOXF line of synthesizers are some of the best on the market. Even so, programming the MOXF can be challenging. We’ve created this guide to provide you with step-by-step instructions on how to create a layered sound patch in five steps. Once your patch is created, you can permanently store it in your Yamaha MOXF.
The five steps to program a layered sound patch in your Yamaha MOXF are:
1. Select the Yamaha MOXF Voice Mode
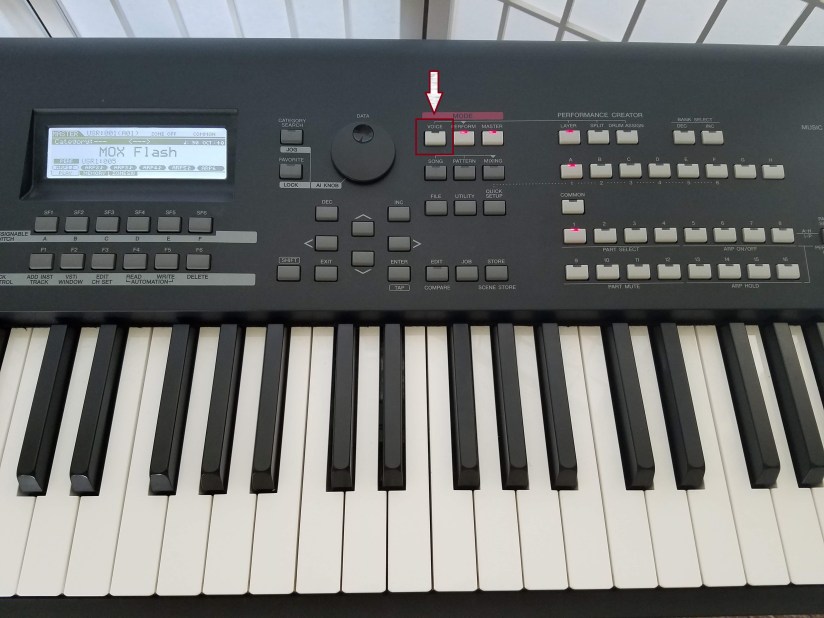
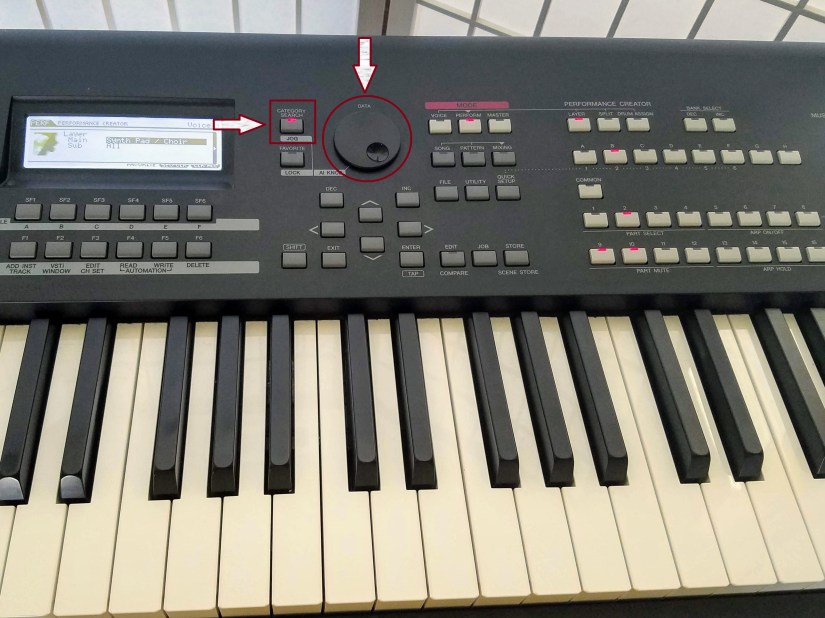
The first step in programming a sound on your Yamaha MOXF is to select voice mode. You can do this by pressing the “VOICE” button located to the right of the radial data dial. Once you’ve pressed this button you can select the first voice (aka, sound) you want to include in your layered sound patch.
2. Choose Your First Sound
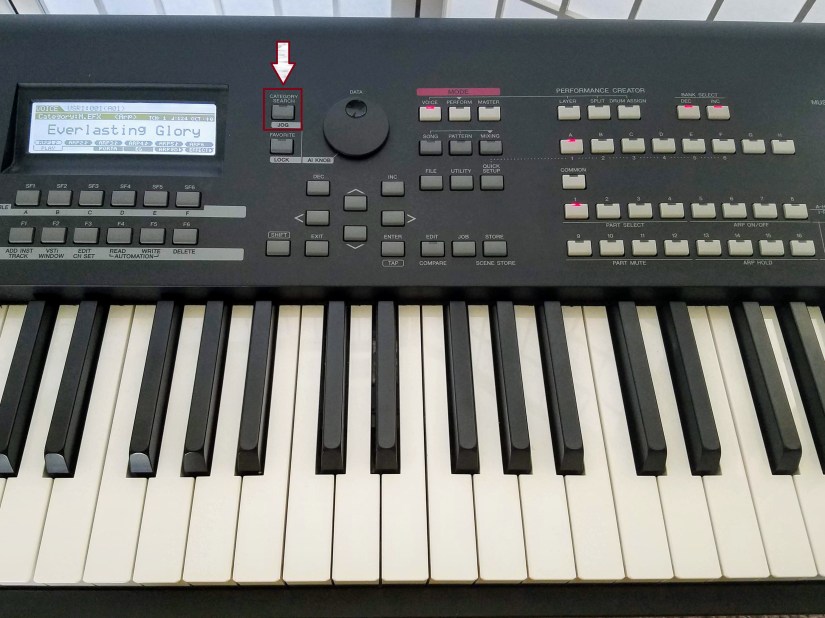
Now that you’re in voice mode, you need to choose your first sound. You’ll start by pressing the “CATEGORY SEARCH” button to the left of the radial data dial. This takes you to a menu where you can browse the Yamaha MOXF sounds. Yamaha has published a voice list that details all the available sounds in the MOXF, making choosing a sound easier.
Scroll Through the Voice List & Select Your First Sound Category
 The next part of this step is to scroll through the voice list to select your sound category. You’ll do this by turning the radial data dial. When you do this you’ll be able to scroll through the available categories shown on the display of your Yamaha MOXF synthesizer. Once you’ve found the right category, you’ll again press the “CATEGORY SEARCH” button.
Select Your First Sound
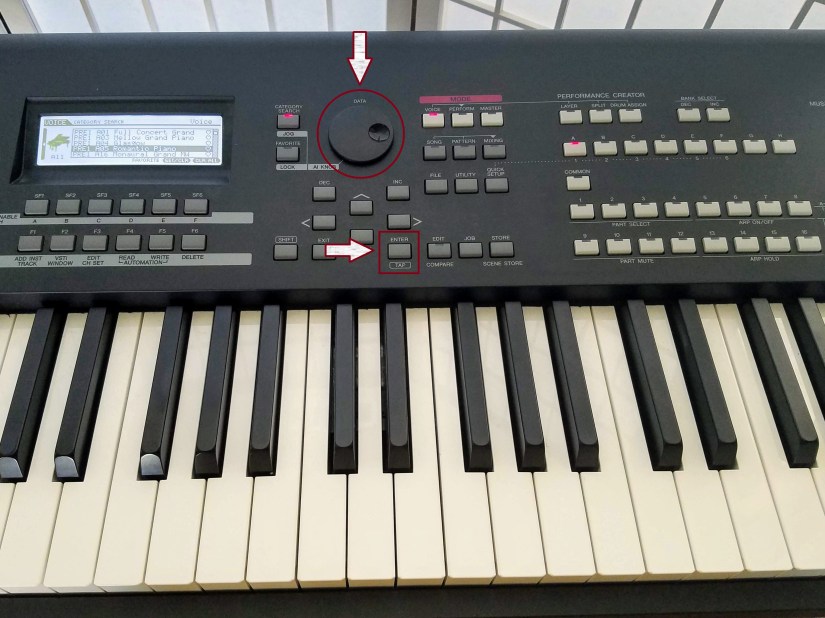
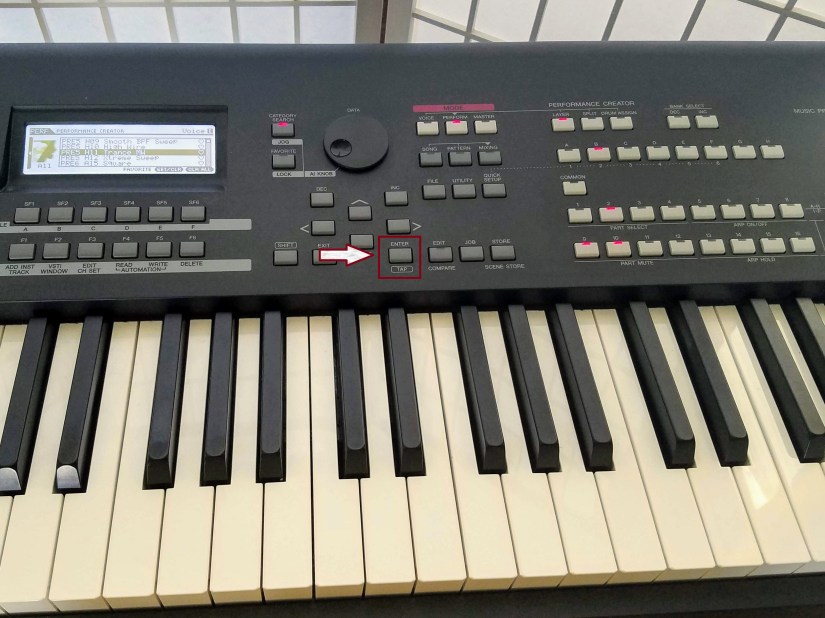
To select your first sound, you’ll again use the radial data dial to scroll through the voice menu. The voice options will be displayed on the screen of your Yamaha MOXF synthesizer. Once you’ve found your chosen sound, you’ll press the “ENTER” button. This button is located above the middle D# key on the MOXF control panel.
3. Layer Your Second Sound into Your Patch
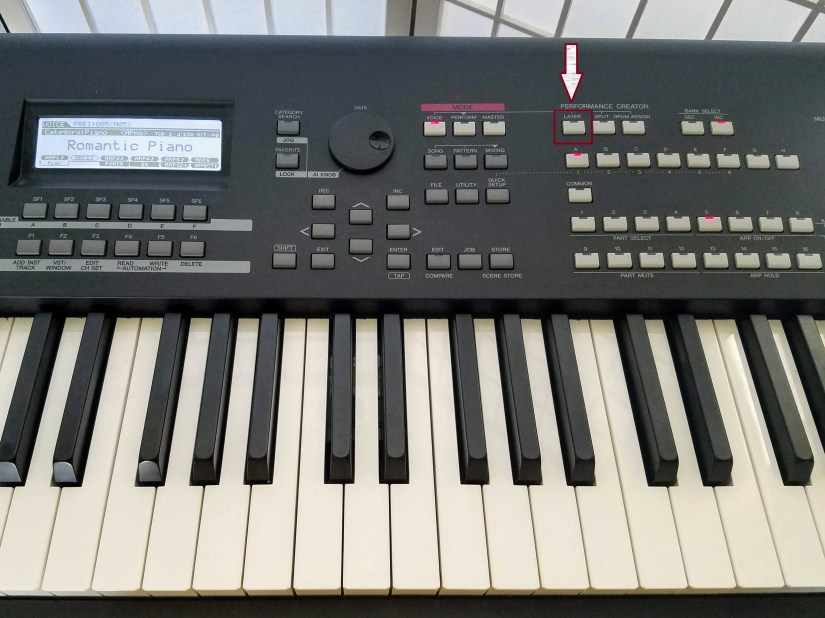
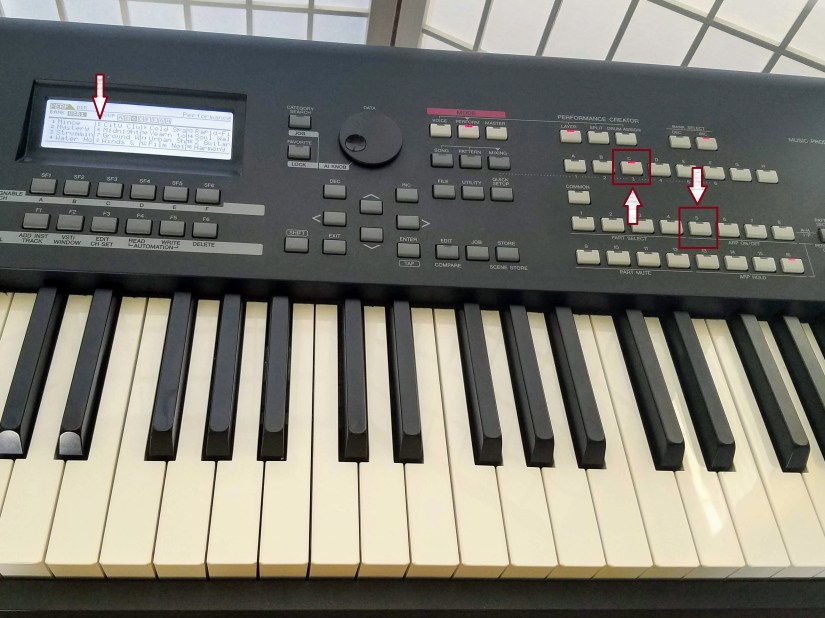
Now that you’ve chosen your first sound, the next step is layer your second sound into your patch. To do this, you’ll begin by pressing the “LAYER” button in the performance creator section of your Yamaha MOXF. This button is located directly to the right of the last button in the mode section of the MOXF keyboard control panel.
Scroll Through the Voice List & Select Your Second Sound Category
As with your first sound, the first task in this process is scrolling through the voice list to select your sound category using the radial data dial. Once you’ve found the category in which your sound is located, you’ll press the “CATEGORY SEARCH” button. Again, this button is located to the left of the radial data dial.
Select Your Second Sound
 This portion of creating a layered sound patch is the same as the process you used to select your first sound. Once you’ve found your second sound in the voice menu, you’ll press the “ENTER” button to select it. This button is located directly above the D# key on the control panel of your Yamaha MOXF keyboard.
4. Save Your New Yamaha MOXF Layered Sound Patch

Now that you’ve layered both of your selected voices into your sound patch, your next step is to save it. By saving it, you’ll be able to quickly access it any time, such as during a performance. This process starts by pressing the “STORE” button, which is located on the Yamaha MOXF control panel above the middle G# key.
Choose a Performance Location to Save Your Layered Sound Patch
Now you’re ready to store your sound so you can access it quickly at any time, including during a live performance. You’ll start by pressing the sound bank button where you want it stored (lettered A-H), then pressing the numbered button (1-16) to identify the sound bank location. The sound patches already located in the selected sound bank are shown on the display.
Finish Saving Your Sound Patch
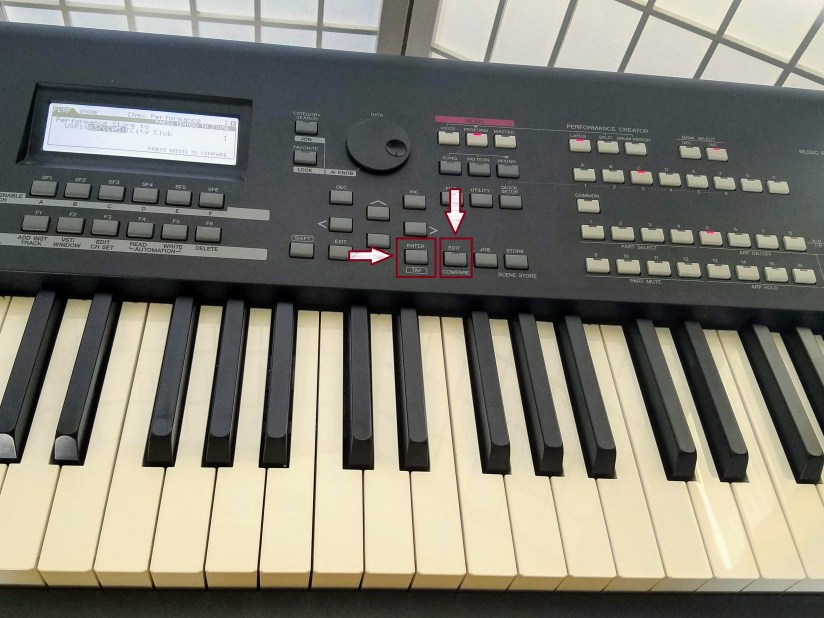
Now it’s time to save your new layered sound patch by pressing the “ENTER” button. If you want to double check that you’re not writing over a sound you want to keep for later use, you can press the “EDIT” button. This allows you to hear how the patch currently stored in your selected location sounds.
5. Give Your New Layered Sound Patch a Name
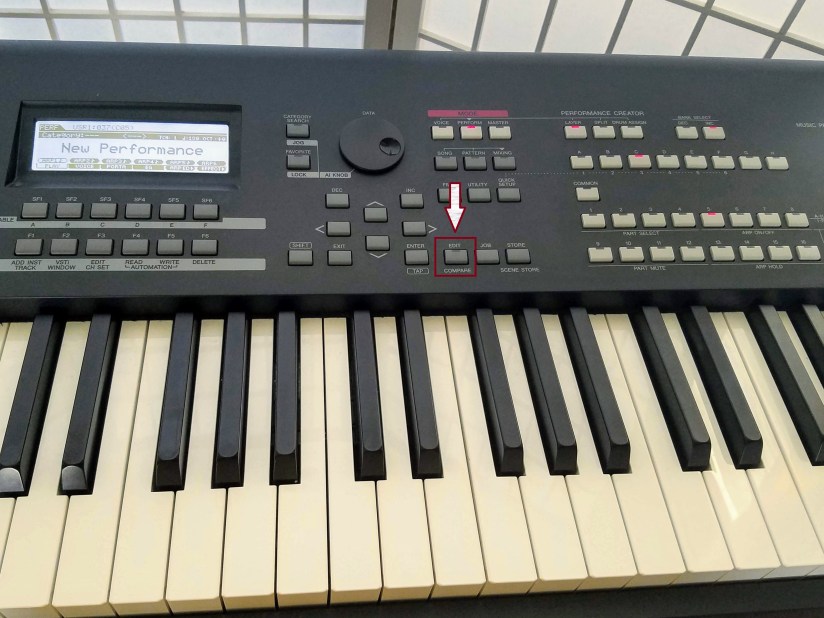
Now that you’ve created your layered sound patch, giving it a name makes it easier to find the next time you want to use it. If you’ve created the patch for use with a particular song, naming it after that song is a good option. If you’re planning to use it in multiple songs, you might want to give it a general descriptive name. This process starts by pressing the “EDIT” button.
Input the Name of Your Sound Patch in the MOXF Sound Bank
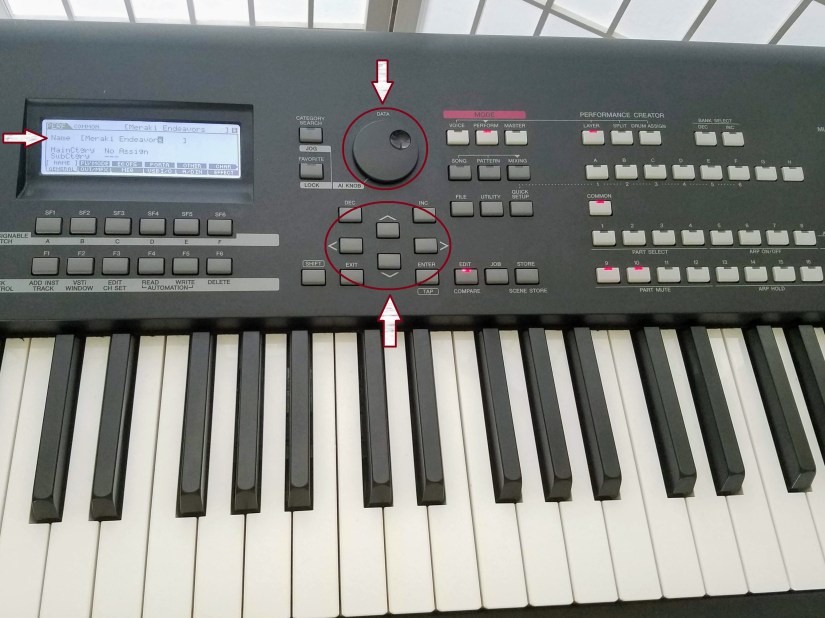
Once you’ve pressed the “EDIT” button, you’ll use the radial data dial to choose each letter, number, or symbol you want to include in the name. Once you’ve made your selection, you’ll use the arrow buttons to move to the next space in the name.
Save Your New Sound Patch Name

Now it’s time to save your sound patch. Just as you did when you created the sound patch, you’ll do this by pressing the “ENTER” button. Yamaha gives you an option of viewing the details about the current sound patch by pressing the “EDIT” button. Once, you’ve pressed save, your sound patch will appear on the display with its new name!
Programming a Yamaha MOXF Sound Patch Wrap-Up

In this guide, we’ve shown you how to create a layered sound patch using your Yamaha MOXF synthesizer. If you follow these five simple steps, the process of programming a sound patch is quick and easy. Creating custom sound patches will make your performances sound professional. Plus, the sound bank makes sound patches easy to access during a live performance.
If you have any questions, feel free to post a comment!

You must be logged in to post a comment.